415-595-5348


Here is a video tutorial on how to build diptychs in Adobe Lightroom. I was hit with a few emails asking about how this is done, and wanted to share some of my discoveries and workarounds. Man, I wish I had something like this years ago. Cumulatively I have wasted years doing this in Quark (cough!) and PhotoShop (time suck). Finally there is a super fast and intuitive way for photographers to put multiple images together on a page. Your money also gets you additional tips on custom sizing, exporting, and archiving your finished diptychs.
Tutorial: Diptychs in Adobe Lightroom
This is the first tutorial shared on this blog, and it feels incredibly geeky of me to post a software demo. Maybe I am paying back the world for all the free demos I have viewed online. Whatever the truth is behind this demo, PLEASE set me straight. If you dig it, share the link. If it is wack, let me know so I can put effort towards building log cabins other things.
click to enlarge
UPDATE: 9/7/14
Here are step by step instructions for creating a diptych in Adobe Lightroom 5 / LR5. Note it is still helpful to view the video as the steps in LR5 are almost identical to previous versions of Lightroom. If you want to export a diptych you still need to use the Print module (though you will not need to make an actual print – see last step.)
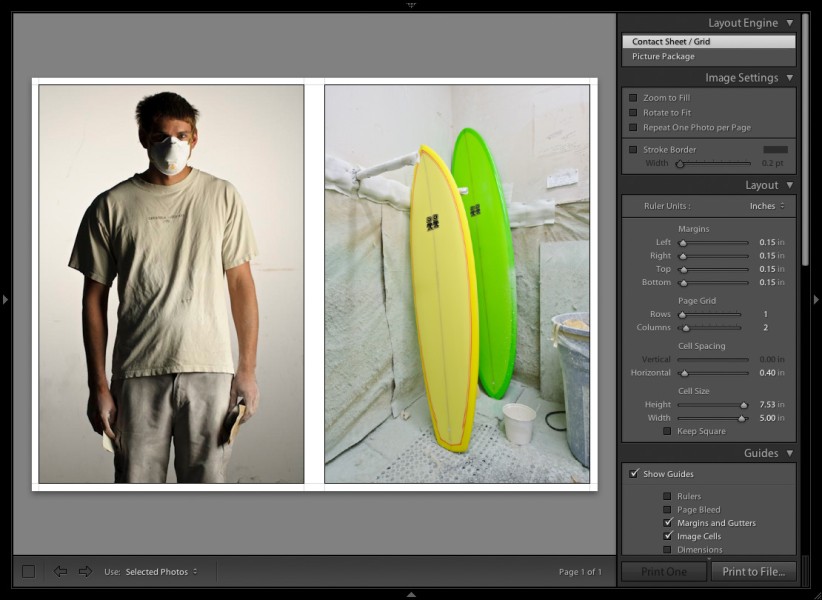
1) put images into a collection,
2) Go to PRINT module, and select any two images in your thumbnail strip.
3) In PRINT module’s “layout style” settings – choose “single image/contact sheet”
4) In PRINT module’s “layout” settings – set page grid to 1 row and 2 colums, adjust the following to taste – margins, cell spacing, and cell size.
5) In PRINT module’s “Print job” settings – choose print to: “JPEG file.” Adjust resolution, jpeg quality, and custom dimensions to your needs.
6) choose: “PRINT TO FILE” button at bottom of the PRINT module – then save your JPEG file to your needed destination. Re import into LR if you want the diptych cataloged.


Thanks Jay! Great tutorial. Very easy to follow.
hey thanks for posting this, picked up a couple of things, saving the templates and the custom file dimensions. Will try sometime soon.
Well done — thanks for putting in the effort to share this time-saving technique!
That’s great Jay! Thanks a bunch for sharing…
Thx Jay – it solved a certain headache I had. Never thought about changing the paper from portrailandscape!
Thanks for sharing that tip!
TNX, Jay, Looking forward to more of your insights.
Great lesson. Keep it up, looking forward to more!
hi, which version are you using? i dont see custom file dimensions in LR2..:(
Mansi – Good point. I should have mentioned this is for LR 2.4 (latest version). I also should have mentioned to access the “custom file dimensions” option you first have to choose the option “print to: JPEG file” in the PRINT JOB settings. Thanks for sending a question.
Everyone – Thanks for the great response. Much appreciated and I hope the demo helps to save you some time.
– JW
Thanks much, got it. And did i mention this was extremely useful. I just made my first ever diptych!:)
Thanks a ton!!! I have already used this tutorial several times and shared with several friends as well!! Great job and a very useful and easy to follow vid. Thanks again!!
Wonderful … thank you so much for sharing !!
Gill
Thank you! I think our Wednesday night class will cover this in an earlier version of Lightroom… but seeing the concepts here first will really help me “get it!”
Great Tutorial mate ! Thanks for sharing !
Thanks a lot Jay! This is a great tutorial.
hey man, just a quick thank you for the explanation. i don’t have lightroom yet but I’m trying it out on their trial download to see if I feel like making the investment. this is one of the features I would have definitely wanted in it so thanks a million for explaining very clearly something I wouldn’t have figured out in probably a long time. when I get some time this weekend I’m going to glance thru the rest of your stuff, thanks again.
Mark – thanks for the visit. A good catalog software like Lightroom (or Aperture) will change your life. Enjoy your investment and hope to hear back from you.
Hey, great tutorial! Have been looking for a way of doing this nice and easy. And now I found it, and the good thing is, I can use LIghtroom! Thanks.
This awesome, thank you, I’m tweeting this immediately…what a great timesaver…thank you, thank you!
Hi,
I made the diptych, but I could not figure out how to save it.
Jas – From the print module, go to the “Print Job” box, print to: choose “JPEG file”, then hit the “Print to File” button. After this is finished you will need to re import the completed diptych. All this is covered in the demo. Good luck.
JW
Hi. Great tutorial–very simple and nice looking. You narrate well, too. Anyway. I’m trying to do this but when I reimport my jpg it looks awful–all blown out and lacking the color of the original. When I open the created file in preview it looks the same as it did in the Print Module. But the reimported version is awful-looking. Any thoughts? I increased the dpi and got the same results.
Thanks,
Meghan
Good tutorial, Jay. In LR3 there’s another ‘Custom’ option in addition to Picture Package, so this allows even more creativity. It goes without saying that you can create triptychs as well. If you create virtual copies, you can also subdivide your image, like these:
http://www.flickr.com/photos/wolfnowl/3027262864/
http://www.flickr.com/photos/wolfnowl/3231069764/
BTW, I’ve added this page to my ‘Lightroom Links’ page: http://bit.ly/LRTips
Mike.
just wanted to let you know that the link was shared with me, by a friend, and i will do the same and pass it on. super tutorial. thank you for it. i’ve been looking for a way to create diptychs with my mac for a while now – and you’ve shown me how. awesome.
Thanks much! Some of the tips will help me with printing, too! I shared the link on both FB and Twitter so hopefully some other folks will check out your blog.
thanks so much for an awesome tutorial! I can’t find anywhere on line though, how to make the contact sheet/grid for numerous different images on one sheet (as you show towards the end of the video with one image repeating in contact sheet form). Any ideas? thanks so much for your tips!
Lindsey
Just do the same as you would with a diptych but select multiple images (best to group in a Lightroom Collection) then increase the numbers of rows and columns in the print module. Thanks for the visit.
-JW
Thanks a lot
Thanks for the tutorial. Ever since I’ve began using Lightroom I really don’t care to use anything else. This gives me one more reason.
Awesome and very clear! Now if only Lightroom made it easier to get the diptychs into the library rather than having to export as a jpeg then reimport. But this works for me for now! Thank you
Thanks for the awesome tutorial! Exactly what I was looking for, and at first I didn’t know what term it is (diptych) so I actually searched around a lot just to know what it’s called. Short and straightforward, thanks again.
Thanks everyone for leaving so many comments and for letting me know how helpful this tutorial has been. Hopefully Adobe will see this as an important feature and allow the diptychs to be added easily to a catalog and allow them to be created as PSDs. Bummer they didn’t do that for LR3.
I’m thinking about doing another demo for users of multiple catalogs. Let me know if you are interested.
-Watson
This is a great quick and intuitive tutorial. Thanks for putting it together! The only problem I have found is that the output sharpening seems very low when printing to JPEG and saving the diptych at 72dpi. After testing at 300dpi, it looks great, but a 900px file at 72dpi looks horrible. Even with quality settings at 100. Any idea why? I have experimented with all the sharpening settings. I would love to use this feature for posting to my blog, the image quality seems completely degraded after output.
@Ryan: There is a glitch in LR when using the Print module “print to JPEG file” settings. The resolution does not match the same quality as the EXPORT tab even if you use the same settings. I have mentioned this twice to Adobe and was there last week talking about it. The only workaround is to save your diptych at 300ppi settings (some suggest 320 ppi) with the “print to JPEG file” option in the Print Module. Don’t bother using 72 ppi. This means you have to then re import the diptych into your catalog, then export out a second version at 72 ppi (set sharpening to standard or high) for your website. It will then look good. This extra step is a pain, but at least you’ll have the high res 300ppi version with minimal compression archived in your catalog. Hope that info helps.
Hi Jay,
Thanks for the tutorial, I’ve been watching the Adobe TV tutorials but this topic doesn’t seem to be covered. I’ve been trying to figure out how to do this for a while.
Cheers,
Stuart
Excellent tutorial video. Thanks so much….
Thank you very much for this tutorial, helped me a lot
Jay, it’s 2011 and this is still the go-to tutorial on Lihtroom diptychs 🙂 Job well done, many thanks.
Thanks Jay excellent tutorial, helped me a lot. many thanks again
It’s cool to hear people are still finding this tutorial useful. Thanks for letting me know. If anyone has any suggestions for a future LR tutorial – let me know and I’ll consider it.
This tutorial is great! Many thanks! One question.
It looks like Lightroom will put the first photo in the timeline in the left-most cell. How can I override this so I can drag and drop files? Right now, it looks like it’s locked and I can’t drag and drop or re-arrange the photos?
Great tutorial! Quick question (and it may be a dumb one…but how will I ever learn if I don’t ask). I’m doing a diptych with your method. How do I switch the photos? I want to see what it looks like when I put the one on the bottom to the top. Thanks.
@Pat – If I understand you correctly you are asking how to arrange photos inside LR? You can only change the sequence of images when they are in a collection.
@Nicole – Put anything you want to possibly use in a diptych into a collection. Set up your diptych template in the PRINT module. Choose a photo in your collection. This will appear first in your diptych. The next image you choose in the collection that is to the RIGHT of the first image will appear second. So to change the order in the diptych just switch the order in the collection. Hope that helps.
fantastic tutorial, thankyou!!!!!!
[…] you use Lightroom? Here’s a TUTORIAL just for you. And if you use Photoshop Elements, I have a TUTORIAL for you too. If you use […]
[…] Jay Watson: Diptychs in Lightroom […]
Thanks for this! I had been messing around with the Print view in Lightroom, but didn’t realize you could drag the borders when ‘custom file size’ was selected. That made all the difference, and now I don’t have to lay my blog post images out in Indesign! Yay!
Just what I needed tonight! Thanks – very well explained.
Awesome…just awesome. Thanks a ton for this tutorial. I just switched from Windows to Mac. I was using photoscape earlier and life was a bit easy. I use Lightroom for editing and this has made life much simpler.
Would be grateful if you have more tips to create pages as well using lightroom.
However this is of great help as I can now create borders as well.