415-595-5348


Here is a video tutorial on how to build diptychs in Adobe Lightroom. I was hit with a few emails asking about how this is done, and wanted to share some of my discoveries and workarounds. Man, I wish I had something like this years ago. Cumulatively I have wasted years doing this in Quark (cough!) and PhotoShop (time suck). Finally there is a super fast and intuitive way for photographers to put multiple images together on a page. Your money also gets you additional tips on custom sizing, exporting, and archiving your finished diptychs.
Tutorial: Diptychs in Adobe Lightroom
This is the first tutorial shared on this blog, and it feels incredibly geeky of me to post a software demo. Maybe I am paying back the world for all the free demos I have viewed online. Whatever the truth is behind this demo, PLEASE set me straight. If you dig it, share the link. If it is wack, let me know so I can put effort towards building log cabins other things.
click to enlarge
UPDATE: 9/7/14
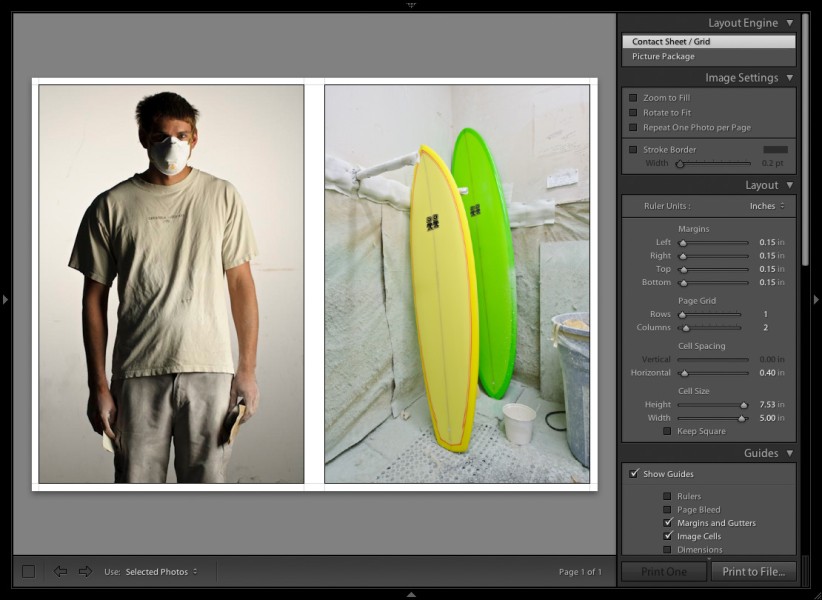
Here are step by step instructions for creating a diptych in Adobe Lightroom 5 / LR5. Note it is still helpful to view the video as the steps in LR5 are almost identical to previous versions of Lightroom. If you want to export a diptych you still need to use the Print module (though you will not need to make an actual print – see last step.)
1) put images into a collection,
2) Go to PRINT module, and select any two images in your thumbnail strip.
3) In PRINT module’s “layout style” settings – choose “single image/contact sheet”
4) In PRINT module’s “layout” settings – set page grid to 1 row and 2 colums, adjust the following to taste – margins, cell spacing, and cell size.
5) In PRINT module’s “Print job” settings – choose print to: “JPEG file.” Adjust resolution, jpeg quality, and custom dimensions to your needs.
6) choose: “PRINT TO FILE” button at bottom of the PRINT module – then save your JPEG file to your needed destination. Re import into LR if you want the diptych cataloged.


Very nice – I learned a bunch from this
Thanks
Thank you so much! This was a great help!
Thank you very much for the tutorial! I’m currently without PS and have already been thinking about how to do these on LR…awesome! So clear and easy to understand.
Very helpful, thank you for sharing! <3 Ann Bennett – Owner, Ann Bennett Photography
Very helpful thanks! I just have one hurdle, I can only get 2 of the same image on the page. Any tips please 🙂
@Marlene – Thanks. Easy Fix. Under the Print module, make sure you don’t have “picture package” selected in the Layout Style (very top of Print module). In LR4 you’ll want “Single Image/Contact Sheet” selected. Pick 2 images in any collection and you’ll have your diptych.
This is great! I work mainly in Lightroom and was trying to find a way to avoid having to add another step when creating a diptych. Thank you so much for sharing!
SUPER helpful! Thank you!
Thanks for the tutorial!
I created my first diptych today, with your help.
This is great Jay! I have been creating diptychs in Photoshop and this is faster, easier and provides more flexibility. I could kick myself for not seeking your tutorial out sooner. I do have a question though…sometimes I create diptychs using one portrait oriented photo, and one landscape oriented photo. Is there a way to create asymmetrical diptychs? Every time I adjust the column guides, it adjust both column widths and I want to size them individually. Any help you could offer would be most appreciated!! P.S. – I have already shared your tutorial with my photog friends.
@Erin – The are a few ways to create a symmetrical diptych when using a vertical and horizontal image.
1) Choose one format and crop into the other so that it matches. Layout Style – choose “single image.” Image settings – choose “zoom to fill.”
2) Create a new template for this set up. Layout Style – choose “custom package.” Click on boxes (cells) to move or delete. Go to Cells option to add a format. Drag cells around to rescale for your needs.
3) Since it would be an extreme crop use Photoshop to have more control. Do this if #2 is too confusing.
Thanks for checking out the site.
Hi Jay!
I am trying to create diptichs and triptychs in LR 5. Do you have a step by step for LR 5 please?
I only see one photo from the 2 I’ve selected when I go into the Print module.
Also, where do I find the custom fit dimensions in LR 5?
Thank you so much!
@Hannah
The steps for LR5 are nearly identical. Images need to be grouped in a collection. Go to the Print module and choose “single image/contact sheet” for the layout style. Custom File Dimensions option is at the bottom of the Print module in a tab called “Print Job.” Mostly everything else in the tutorial is the same. Good luck!
EVERYONE: Here are step by step instructions for creating a diptych in Adobe Lightroom 5.
For LR 5, if you want to export a diptych you still need to use the Print module (though you will not need to make an actual print – see last step.)
1) put images into a collection,
2) Go to PRINT module, and select any two images in your thumbnail strip.
3) In PRINT module’s “layout style” settings – choose “single image/contact sheet”
4) In PRINT module’s “layout” settings – set page grid to 1 row and 2 colums, adjust the following to taste – margins, cell spacing, and cell size.
5) In PRINT module’s “Print job” settings – choose print to: “JPEG file.” Adjust resolution, jpeg quality, and custom dimensions to your needs.
6) choose: “PRINT TO FILE” button at bottom of the PRINT module – then save your JPEG file to your needed destination. Reimport into LR if you want the diptych cataloged.
That should help you greatly. Good luck,
Jay
Thank you so much for this video! I stumbled through creating a diptych a few years ago using Lightroom but couldn’t remember how I saved the final result. Your tutorial is great as I use Lightroom for all my major post editing and organizing and is much faster and less steps than PSE. I will definitely share the link with my photo buddies!!
Hey Jay, thanks a lot for this! I just have 2 quick questions:
1) is there any workaround to decreasing the space between pictures? i can’t seem to be able to get them together..
( my workaround for that was to create a triptych and just leave the last picture empty
2) For some reason Ligthroom doesnt let me re-import them… any ideas?
@Diego
1) You can size your custom file dimensions to fit the format of your two images. Both images would need to be the same aspect ratio. Or in the Print Module’s Image Setting choose “zoom to fill”, and then in the Layout settings set the “cell spacing” to 0. You can also set the margins to 0 if you don’t want a border.
2) In Print module’s Print Job settings, choose print to: “JPEG file.” Hit the Print to File button. Then double check your import settings.
[…] double diptych. I recently came across a great tutorial by Jay Watson, using Lightroom to create Diptychs He shows an easy way to create a template and generate diptychs quickly and consistently. I […]